Stephanie at the Quarter Incher.... Stephanie go check your email!!!
Saturday, May 11, 2013
SMS 241 Tote Winner!!!
Thanks again to all who participated. According to the random number generator. The winner is:
Friday, May 10, 2013
Thank you
I am so incredibly overwhelmed (in such a good way) at the number of people that entered in my two giveaways for Sew Mama Sew's Giveaway day. I had a total of 473 entries in the giveaway for my 241 tote and 399 for the Etsy gift card.
Oh. My. Goodness.
I am absolutely flattered at the incredibly sweet things that people said about my bag and my other projects.
Seriously, tearfully flattered.
I'm so, so glad that I took part in this event and and I'm incredibly thankful for EVERYONE that stopped by...even if it was just to pop in for the entry or if you liked me enough to follow me in one form or fashion. Your time and energy is yours to spend, and the fact that you gave me your time and want something I created...wow.
Thank you, thank you, thank you!! I was trying to respond to all the comments but that's a LOT of emails to sort through...640 actually. If I haven't responded, I really want to, especially to those who were so kind...it just may take a bit ;) Just know that I read each and every one!
I will announce the winners tomorrow...I drew the winners already via a random number generator but I am waiting for a Saturday Surprise...hopefully I can make 2 people's day!!!
Wednesday, May 8, 2013
Greenbacks wallet
I've had the pleasure of doing some pattern testing for Sara at SewSweetness, so when she asked for testers again, I gladly jumped on board. I'd been wanting a new wallet for myself, so this was perfect timing. Her Greenbacks wallet comes in three different styles, from beginner to advanced. Although I don't consider myself an advanced sewer, I fell in love with the advanced variation of the wallet.
After settling on the fabrics, the cutting and assembly of the panels were easy peasy. The whole process was a breeze until I got around to adding the exterior zipper and binding. Then the bleeding and cursing began.
Sara had warned that the main reason this pattern was rated as advanced was because of this last step. I had anticipated adding the binding by hand, but I underestimated how much of a pain in the arse that is (I've never adding binding by hand before). Quilters actually do this by hand stuff all the time?! Yet another reason I am not a quilter. I used lots and lots of pins and stabbed myself probably about 5 million times. I think I may have lost a pint of blood in the process. Sewing the binding through the heavy nylon of the zipper is what really got me, it HURTS.
After what felt like 7 hours, the binding was on and the wallet was complete! The binding is wonky (that's what I get for not knowing how to hand sew properly). I would rip it out and redo it but I cringe at the thought of more stab wounds so it's gonna have to wait.
The wallet is a serious wallet. I cannot believe how big it is, it's practically a clutch and I LOVE it. It's the perfect mom wallet, and has everything you could need. I love that the zippered pocket is inside, I love that it's in the middle and acts as the divider, I love that the card slots are vertical instead of horizontal, I love that there are card holders on both sides. It's perfection!
Seriously, do yourself a favor and go to Sara's shop and buy this pattern immediately!
After settling on the fabrics, the cutting and assembly of the panels were easy peasy. The whole process was a breeze until I got around to adding the exterior zipper and binding. Then the bleeding and cursing began.
Sara had warned that the main reason this pattern was rated as advanced was because of this last step. I had anticipated adding the binding by hand, but I underestimated how much of a pain in the arse that is (I've never adding binding by hand before). Quilters actually do this by hand stuff all the time?! Yet another reason I am not a quilter. I used lots and lots of pins and stabbed myself probably about 5 million times. I think I may have lost a pint of blood in the process. Sewing the binding through the heavy nylon of the zipper is what really got me, it HURTS.
After what felt like 7 hours, the binding was on and the wallet was complete! The binding is wonky (that's what I get for not knowing how to hand sew properly). I would rip it out and redo it but I cringe at the thought of more stab wounds so it's gonna have to wait.
The wallet is a serious wallet. I cannot believe how big it is, it's practically a clutch and I LOVE it. It's the perfect mom wallet, and has everything you could need. I love that the zippered pocket is inside, I love that it's in the middle and acts as the divider, I love that the card slots are vertical instead of horizontal, I love that there are card holders on both sides. It's perfection!
Seriously, do yourself a favor and go to Sara's shop and buy this pattern immediately!
Monday, May 6, 2013
241 Tote giveaway
To keep the fun going...a second giveaway!!!
The last Sew Mama Sew giveaway week was about the same time I started this blog. I was new to the whole blogging thing, as I still am but this time I want to join in the fun by having my first giveaway!
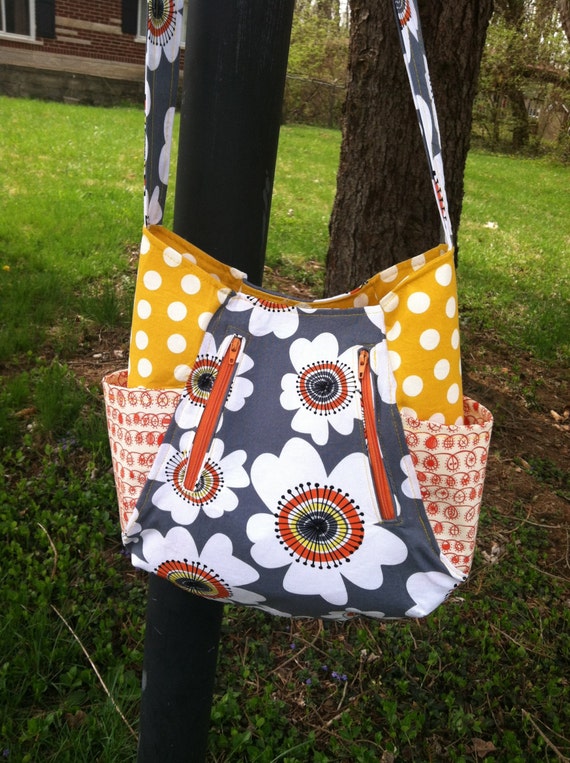
Who doesn't need a new bag for summer? This colorful and fun handbag was made using Noodlehead's 241 pattern.
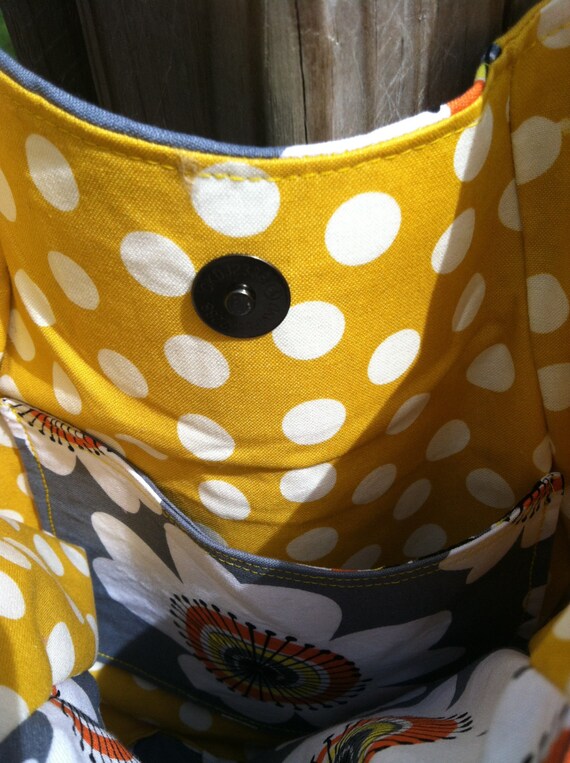
It measures 15" W x 10" H and has pockets galore! There are 2 zippered pockets on the outside, that hold much more than you think possible, and two generously sized slip pockets on the exterior that easily fit in a large pair of sunglasses and cell phone.
The interior also has a smaller slip pocket to further keep you organized. The strap is the perfect length to toss over your shoulder or wear cross body if you prefer.
This giveaway is open to anyone who resides on earth and all you have to do is leave me a comment telling me about your favorite summer activity. I will announce the winner the following Saturday May 11th via email. Please make sure to leave your email address, if you don't have a Google account so I can reach you!
If you follow me, you get an extra entry...just leave another comment letting me know that you are a follower For another chance to win like my Facebook page and leave an additional comment letting me know.
That's 3 chances to win!!!
Sew Mama Sew Giveaway Day!!!
THIS GIVEAWAY IS NOW OVER...THANKS TO ALL THAT PARTICIPATED :) NO FURTHER ENTRIES WILL BE ACCEPTED
The last Sew Mama Sew giveaway Day was about the same time I started this blog. I was new to the whole blogging thing, as I still am but this time I want to join in the fun by having my first giveaway! So in honor of Giveaway day I'm giving away a $25 Etsy gift card!
This giveaway is open to anyone residing on Earth, and all you have to do is leave me a comment telling me what goodies you would spend it on! The giveaway will close at 2 p.m. EST on Friday May 10th and I'll announce the winner the following Saturday May 11th via email. Please make sure to leave your email address, if you don't have a Google account so I can reach you!
If you follow me, you get an extra entry...just leave another comment letting me know that you are a follower For another chance to win like my Facebook page and leave an additional comment letting me know.
That's 3 chances to win!!!
Thursday, April 18, 2013
DIY fabric labels
I've been wanting to purchase labels to see in my items for a while and there are two options: buy or DIY.
The Etsy route was pretty pricey, and a bit overwhelming to sift through options and handling times. The DIY route was certainly going to be it for me.
I found several tutorials that involved iron on transfers and twill tape and that was the route that I was prepared to go. The downside to this was that although it didn't seem over complicated, it seemed fairly labor intensive in that you had to make the transfer, cut them out, iron them to the tape, cut out the labels then fray check the edges. You were also limited to the size of the twill tape you purchased.
While at the store to buy the iron on transfer paper, I stumbled upon this:
Then the light bulb went off, why not just print them directly on fabric and cut them out, vs going to the trouble to print turn iron them on the twill tape? That would totally cut out a couple of the steps!
The catch?
I don't even have office on my computer, I have the generic free version: Open office. Now, for all of my purposes this has suited me just fine but I had to find a way to get these labels onto this sheet in a way that I could customize (which I couldn't do with the address label template). And fill as much of the sheet as I could, so to maximize my labels per sheet. I used my logo, shrank it and added it next to the font, then just copied and pasted it into the columns I formatted.
After a few tries and some tweaks, I ended up with this:
![]() |
| Printed on regular paper for the rough draft |
That's a total of 36 labels per sheet, and there were 3 sheets per pack. I was able to use a 40% off coupon for the 9.99 they cost, bringing it down to 6.00. Doing the math that's about 5 cents a label. The cheapest labels I found on Etsy were about 15 cents each and were not customizable.
The whole process took under and hour and you can print with colored ink if you choose. All you have to do is let the ink dry for about 10 mins ( I was too impatient for this, I just took a hair dryer for a few minutes), then the directions say to press it carefully for 1-2 minutes to set the ink. It advises a cold water bath to make them completely colorfast.
You could totally use colored ink, or change the sizes of the labels and since they don't require fray-check, you could make fold over labels too!
I'm considering trying to dye the labels once they come out of the printer. This brand comes in both an off white and white, as well as am iron on version as well that the manufacturer claims is sew able.
Eek! I love how they came out! The are .75"h x 2.5" Long. no fraying and no apparent color transfer! 6.00 for 108 fully custom labels in less than one hour?! Yes, please :)
Sunday, April 14, 2013
Celebrating the Sunshine--241 Tote round 2
It's finally warm around here, the sun is out and it is absolutely beautiful. Time for flip flops and flowers! What better way to welcome the season than a new bag?! I pulled out my 241 pattern by Noodlehead and pulled the most sunshiney fabrics from my stash and this was the end result. It oozes sunshine, just like I wanted :)
I listed in my Etsy shop, but I"m already thinking of deleting the listing and keeping it for myself.
The last time I made a 241 tote, I was a bit disappointed at the size, but by using both the exterior slip and zippered pockets (and actually remembering to add a slip pocket to the lining this time), it holds so much more than I really need it to.

Happy Spring :)
I listed in my Etsy shop, but I"m already thinking of deleting the listing and keeping it for myself.
The last time I made a 241 tote, I was a bit disappointed at the size, but by using both the exterior slip and zippered pockets (and actually remembering to add a slip pocket to the lining this time), it holds so much more than I really need it to.

Happy Spring :)
Subscribe to:
Posts (Atom)