Tuesday, December 31, 2013

Good bye 2013!


Doesn't it seem that as we get older the years go by faster and faster? I can't believe we are ringing in 2014 already!!! I spent a lot of time sewing this year, and I do feel that I have learned a lot (thank you internet!) and my confidence with tackling challenges has certainly improved. I no longer dread zippers and button holes and I have come to a mutual tolerance for each other.


A few of my faves from this year:

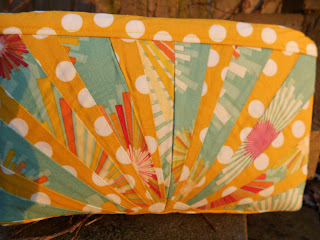
My first (and only) attempt at paper piecing


241 tote


Bow Tote

My love affair with the Lapin Noir Pattern:


Silver Cinemas Bag

Kennedy bag


Park West Bag


      Necessary Clutch wallets


A few of the clothing items I made:

A variation of the Pier 49 Pants
NoWhere Man Pants
Olivia & Oliver Peacoat


I'm looking forward to what 2014 holds!


Friday, December 27, 2013

A Christmas Bag


I'm glad to finally get to share this guy, as it was a present I had to keep it quiet til after Christmas.

My uncle asked me to make a bag for my cousin and the only instruction was "lots of pockets". With that, I knew immediately the bag I wanted to make. 

I've said this before but it totally bears repeating. The Lapin Noir pattern by Sew Sweetness is THE best bag pattern ever. This is the bag I use every day and when it dies I'll make another, it is by far the most functional bag I've ever carried. 

I had just made a bag in the red poppies from Joel Dewberry's Notting Hill line, and although I usually don't like repeatedly using the same fabrics, it seemed absolutely perfect for one last bag. The colors and florals are spectacular and both modern and vintage at the same time and I knew my cousin would love it! 

After finishing it, I seriously fell in love with this guy. I adore aqua and red, throw in the polka dots and I couldn't ask for more! I seriously had a bit of a moment when shipping this bag off to Chattanooga. However, it is now in the hands of someone who loves it as well and I'm glad :) 


This bag is also in the top fifteen over at the Sew Mama Sew Sew Sweetness bag contest. If you haven't voted yet, please take a minute to pick your top three bags. There are seriously some amazing bags in it!!!! 


Monday, December 23, 2013

SMS Sew Sweetness Bag Contest


Merry Christmas to me!!! I'm super stoked that not only one but TWO of my bags made it to the final fifteen in the Sew Mama Sew Sew Sweetness Bag contest. I am truly flattered to have made it to the public voting, as there were so many absolutely stunning bags entered!! 

Please go check out all the lovely bags that made the top fifteen and vote for your top three, they are all awesome and are deserving of a win (not just mine, but I'd be ok with you voting for me too ;)

Go vote for your faves today!


Saturday, December 14, 2013

SMS Giveaway Winner

The winner of the Kennedy Bag is....


Thrift Store Crafter! If this is you, go check your email :)

Thanks so much to everyone that entered! I'm honored that so many of you wanted my bag.

This is such a great event and I'm glad that I found some new blogs to follow, I loved reading each and every comment about your holiday faves!!  I hope y'all have an absolutely wonderful Holiday Season!!!

Beatnik Waist Bag


I was lucky enough to test the Beatnik Waist Bag pattern for Sara of Sew Sweetness. I've been looking for a waist bag pattern for a while, so when Sara emailed me I was ecstatic to be able to test it! 


I went back and forth with my fabric choices and even after I did settle on the text print, I went back and forth about if I wanted to have the pockets contrasting. I seriously need to work on my indecisiveness lol.


In addition to the front pockets, there is a zip pocket on the back and a divided slip pocket inside.


I also used this bag as my excuse to buy a real snap setting tool, good-bye cheap plastic doodad and hammer (which I only had about a 50 percent success rate with)!! Now I'll be adding snaps a whole lot more :)


In the end, I'm happy with how this turned out. I know most of us gals don't use waist bags on the regular but there are times they are so, so perfect...craft shows, sporting events, for runners and when you need your hands free! now you can make your own and not have to buy those hideous ones that are hard to come by in stores!!! Head over to the Sew Sweetness pattern shop and get yours !!!


Monday, December 9, 2013

SMS Giveaway


It's time again for Sew Mama Sew Giveaway day!! Just in time for Christmas.

For those of you who are just stopping by for the first time, welcome! I'm so glad you stopped by!

I'll be participating in the festivities and offering a my version of The Kennedy Bag to one lucky winner! I can promise to have this shipped in time for Christmas to the winner but will have to limit this to residents of the US only so that I can honor this promise.


The Kennedy bag measures: 14” long x 11” tall x 5” deep


To enter, please leave a comment below telling me what you are most looking forward to this holiday season. To earn additional entries, follow via bloglovin, Twitter (@thenosypepper) or "like" my page on FaceBook and leave an additional comment for each telling me how you follow. That's potentially 4 entries!!!  I will draw a winner via Mr. Randomizer after 5pm PST on Friday December 13, 2013 and winners will be notified no later than Saturday December 14th via email. If you are a no reply blogger please enter your email so that I can get in touch with you!


Good luck and have a wonderful holiday season!!! 


Saturday, December 7, 2013

Lucky Denver Mint Bag vs. Jack Frost

Here in Cincy we had our first big winter storm. It was less snow and ice than predicted but it made for a pretty nasty day travel wise. Stuck inside for the day, what else to do but sew?

Considering the icky weather, this fabric seemed fitting and I had just enough to make a Lucky Denver Mint Bag from the book Big City Bags by Sara Lawson.

I was a little worried about sewing the zipper on the curve but it was surprisingly easy. 

I did add a front pocket to the bag, which was my only deviation from the pattern. I've come to love exterior pockets for handy access to my phone when I'm out and about. 

It came together quickly and I didn't have to rip out a single seam in the process. Yay for that!!!


The bag is a fold over style, and can be worn folded or unfolded. I tend to like the folded look myself.
This was the easiest zipper, I have ever installed. 


This bag is deceptively roomy when unfolded and has an interior slip pocket as well. I purposefully chose a bright fabric for the interior, it's cold, icy and icky out and I wanted something that looked cheerful and warm. 


Take that old man winter!!!

I'm using this bag as an entry in the sew mama sew's Sew Sweetness bag contest! Wish me luck, there are some amazing bags entered!!! I'm also entering my Piccadilly Circus Bag.

Keep warm :)


Tuesday, November 26, 2013

I heart Joel Dewberry


I got my copy of Big City Bags by Sara Lawson last week and knew that I wanted to make this Piccadilly Circus Bag ASAP. I am usually not a floral girl but I am yet to find a Joel Dewberry print that I don't adore, throw in some polka dots and I heart this combo. I've been a fan of Sara's bag patterns (they are amazing) and was stoked to get this book. The steps aren't as specific as the patterns in her shop but it was still super easy to follow, also she has a section on some common techniques used in bag making: adding zip pockets, zipper tops, and thank goodness also installing adjustable straps (these things are deceptive I swear, they are not hard to install but my brain ALWAYS gets confused about what goes where without blatant step by step instructions....EVERY. SINGLE. TIME.)


The pattern was seriously easy to follow and came together in less than a night. It did require some hand stitching on the interior of the bag, as I couldn't find a way to get the bottom of the zipper panel attached to the bottom of the lining by machine. (I tried it and it resulted in a lot of cursing and some quality time with my seam ripper.)


I also got to play with some of the decorative stitches on my machine, these leaves seemed perfect for this bag. 


You can see them much better on the top stitching on the interior pockets


I don't have a fabric "budget" (although I should), I tend to order stuff when I find a good sale, and I often buy half yard cuts, but I am a fastidious fabric cutter (waste not, want not right?) so I try and see how much I can squeeze out of these cuts. This usually means I use a third fabric on the lining (often a matching solid). This bag was pretty forgiving and I was able to not only get a bag out of my main prints, but I had enough left over to match a matching Necessary Clutch Wallet (another fave pattern). I just used a matching yellow solid on the interior for both since. 


My only complain is that I feel like I didn't interface the zipper panel enough, it's not as stiff as I would like (that's why it looks wonky in the center panel). It calls for one layer of the deco fuse, but I've normally used two and gotten better results.

Overall I'm in love with the bag and wallet, I heart Joel Dewberry, polka dots and this color combo. This fabric reminds me of retro textiles in a very good way. This bag is actually really big, and I love the zipper top! If you haven't already go and order this book!!!


Monday, November 18, 2013

An expensive mistake


See that? That my friends is a 30 dollar skein of beautiful hand dyed wool yarn that was supposed to be a honey cowl. What is it now? A horrific, giant, ugly 30 dollar knot that took about 2 weeks to make. I could cry.

Ugh.

It started off simple enough, I was going to make the short version of the honey cowl and simply make it wider. The yarn has a lovely drape and I adore the color so I was super excited about it. After a few rows I realized that I had it twisted, but I thought "no biggie, it can just be a honey mobius". After finishing it and casting off, I realized that it was not only twisted once, but easily three times.  

Was it still wearable? Yes, I could have easily adjusted it and it would have been fine since I made it so wide. But, after spending the money on it (30 dollars can buy a lot of different things as far as I'm concerned), I thought I would just pull it out and start over, having learned , my lesson to be more careful (I'm still very much a novice when it comes to knitting). About 30 seconds in the whole plan went to hell quickly...apparently I do not know how to unravel a cowl. It ended up a giant mess, horrifically knotted and I'm fairly sure not salvageable. 

You live you learn. Since this debacle I did some more Googling about how to keep the rows from twisting in the round. Hopefully I will avoid this mistake again. Sometimes you have to laugh I suppose :) 


Thursday, November 7, 2013

For the boys blog hop


I am so excited to be joining in on the for the boys blog hop sponsored by sew we quilt. I have a four year old who is 110% boy. As we mamas of boys know, there are fewer patterns and projects for our little guys. My husband assures me this theme will be repeated throughout his life (hello mens' vs womens' sections in stores). Thankfully though, there are still some pretty awesome patterns and projects out there for our boys.

With weather definitely cooling down around here, it was time to start on some autumn clothes for my little man. I picked a couple of my faves (which are actually pretty unisex) and set off to work.


First up, I put together these "skeleton pants", using an awesome pattern called Nowhere Man Pants by Shwin Designs. I picked up this pattern a while back on sale and it is absolutely one of my fave pant patterns. The fit is perfection and it's a very quick sew (I finished this pair from cutting to hemming in about 2 hours). I snuck some of my Halloween fabrics in on the pocket and belt loops and my little guy loves what he has dubbed the "skeleton pants". The main fabric is a lightweight denim chambray that was left over from a bag project I finished (yay for using all scraps!).


To go with the pants, I pulled out my Olivia and Oliver Pea Coat pattern by Peek a boo Patterns. I made one of these last year and it was my first 'real' garment I made. It's a very beginner friendly pattern and like the pants, goes together quickly. Even setting the sleeves in this one is a breeze. The scariest part (for me) was putting in the button holes.


Unfortunately the Universe was not cooperating with me getting these photographed, and it had to be done at night in my kitchen...oops! He still turned on the cheese for the camera :)


Thanks so much for stopping by!!! Please check out the other awesome bloggers sharing their projects today:

November 8th