Showing posts with label pattern review. Show all posts

Thursday, October 12, 2017

The Bag Buzz 10/13/17


Welcome to the Friday the 13th installment of the Bag Buzz! Read on to catch up on the latest pattern releases, new products, sales, tutorials and more!

*This post may contain affiliate links.

New Releases:

The FREE Sunshine Wristlet from Bagstock Sewing Patterns

No automatic alt text available.


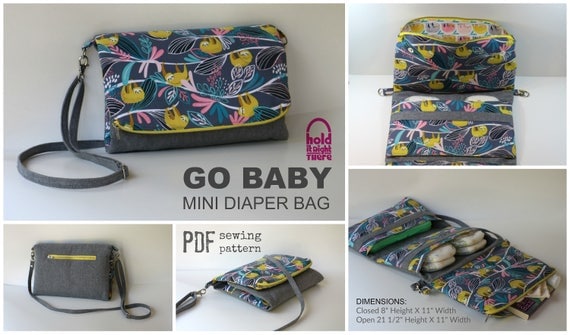
The Go Baby Mini Diaper Bag by Hold it Right There Bags:


Craftsy Class: The Cross-Body Bag: Sewing with Waxed Canvas. 


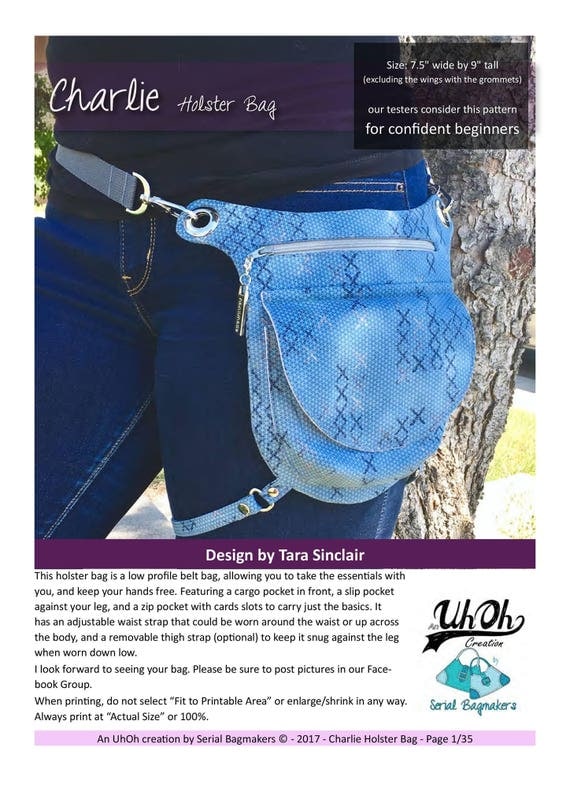
The Charlie Holster Bag Pattern by Uh Oh Creations: 

The Myles Work Bag by iThinkSew


Sales:

Emmaline Bags is currently underway with their 5th annual snow sale! Use code SNOW2017 at checkout.

No automatic alt text available.


Giveaways:

Enter to win a Copy of Stitched: Sewing organizers and a pack of Aurifil Thread


Hawthorne Threads is Giving away a fat quarter bundle of Michael Miller's Llama Navidad:


Joann Fabrics is giving away a 100, 250 and 500 gift card. The fine print here is that you need to sign up through facebook and opt in to text messages or email.


Craftsy is giving away mystery stash boxes


New Products:

I'm dying to try the new Easy Strap Anchors from Emmaline Bags!! Available in 5 finishes: 

No automatic alt text available.


Also, if you are swooning over the new irridescent finish, metal bag labels are now available from Emmaline Bags:

Image may contain: text


Other News:

Chris W Designs has just released a video to accompany her Bodacious Bowler Bag, perfect who like a little more of a walkthrough when sewing bags. 
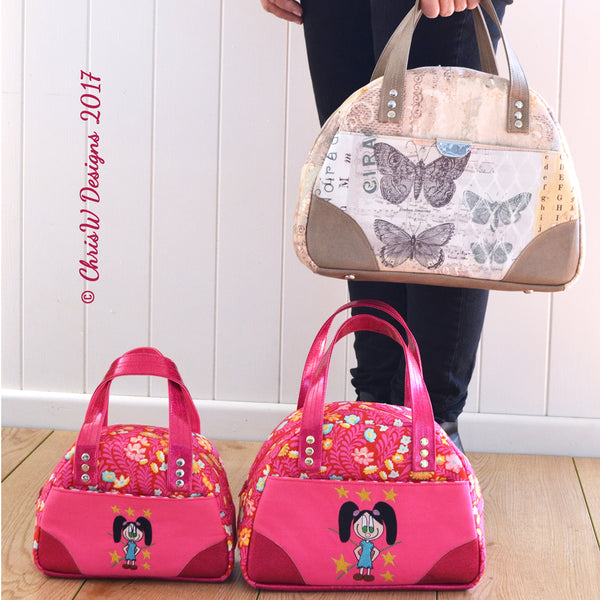
Bodacious Bowler

Mrs. H has now released her patterns in PAPER format!! So for those of you who prefer paper patterns with beautiful color photos and more durable paper to cut the patterns from, this perfect for you! 
The Fiesta Tote Paper Pattern


Tuesday, June 20, 2017

Speedwell Sling Bag


As summer time kicks into high gear around here, we are hitting the amusement park when we can. As much as I love my shoulder bags and big totes, they aren't the most pratical thing to carry around from ride to ride all day. My two year old snagged my beloved Butterfly Sling Purse, and I needed a new bag for those long day adventures. So when I had the opportunity to test the Blue Calla Speedwell Sling Bag, I was all over it.

This is a sporty sling style bag that is the PERFECT bag for summer adventures. 


This clever bag has a roomy interior with two slip pockets (think sunscreen, small snacks, and even a few diapers and a small pack of wipes). The exterior has a zippered panel that opens wide to make the pefect place to stash your phone, and keys. Stash your wallet and cards in the interior zip pocket.


This pattern also gives directions to add grommets to feed through your ear buds, which I opted to omit but you can see on other versions here


This pattern came together pretty quickly, despite being a lot of pieces. I went out on a limb and tried to fussy cut my zipper panels for the front and I was very pleased with the results:


The zippered front panel is secured to the top of the bag with your choice of magnetic snap, a turn lock or a tuck lock. I opted for a magnetic snap for this one and the slim ones from Emmaline are super strong and hold very very well (I almost broke a nail trying to pry them apart to install them). 


The bag is constructed with fleece, but the back panel is stabilized with Peltex so it's a structured bag even with just the fleece. It's also written for you to choose which shoulder you wish to wear the bag over. 


This bag is rated for an intermediate bag maker, and I would completely agree with that rating. No parts of construction are difficult, but the number of pieces and different techniques could make this daunting for a beginner. 

Like all Blue Calla patterns, each step is easy to follow and the instructions are paired with full color photos making even more difficult steps of construction easy to follow. The lining is finished by binding the seams, which for me is always the most difficult part because I end up doing them by hand (I'm hopeless binding by machine). 


I'm looking forward to carrying this around tomorrow when we hit the amusement park! 


Monday, June 5, 2017

Castell Day Bag


Introducing the Castell Day Bag Pattern by Emmaline Bags. I had the pleasure of testing this lovely pattern a few weeks ago and I ADORE her! This bag is a 'BIGUN and is designed as a day trip bag, or an overnighter. It is a framed bag, a la carpet bag style but without the vintage vibe of most carpet bags. You will need the C style frames from Emmaline.. 


I stitched up this one in a mix of various Cotton and Steel prints along with some Essex Yarn Dyed Linen and I love the combo. 

The exterior boasts two large pockets that secure with a magnetic snap in the flap. The flap is the perfect place to add some bling and as you can see I will a little hog wild with the copper hardware (It's my current crush). For this bag I used the Emmaline curved metal edge trim, the script style bag label, strap ends and rivets all in copper. 


The bag opens WIDE which makes it perfect for stuffing and unstuffing (one testing showed hers with a carton of milk, which, barely took up much room inside). 


Inside there are two zippered pockets, which are gathered at the bottom to maximize your stuffage ability. They hold way more than a standard zip pocket. 


The zipper panel is so, so easy to install on this bag, as is installing the frame. It simply slides inside the casing you make with the zipper. Nothing complicated at all!


This was also my first time successfully installing rivets. I have tried them in the past and had zero luck, I have been using Chicago Screws for the longest time because Rivets and I have never played nice. After using these rivets from Emmaline, I learned that it wasn't me!!! Not all rivets are created equal and crappy rivets make for crappy results. I had tried multiple times with some value pack I picked up at the craft store. Now, I am no longer afraid to use rivets (just not the crap ones!). 


This bag is rated for an experienced intermediate to advanced sewist, but I don't believe it's because it's overly difficult, but there are a LOT of steps and pieces involved. A lot of the hardware I added is optional (rivets, edge trim, strap edges, bag label) so you can add as much or as little as you like. 


The pattern is clear and easy to follow, and although it's straightforward the number of pieces does take a while to put together. It's not a one night project, but it's totally doable in a weekend. I'm glad I ordered a second set of c frames because I am looking forward to making another. Head over and pick up your pattern and frames at Emmaline Bags


Tuesday, May 30, 2017

Hosta Hobo


The Hosta Hobo by Blue Calla Patterns is one that I scooped up the second it was released last year. This is a rarity for me, as I always seem to have more patterns then I'll ever have time to sew. Something about Hosta pulled me in, and I had to have this pattern! 


However, as it often happens, after purchasing the pattern it got shelved for several months. Something else would always come up and another project would get in the way. A couple months ago I couldn't wait any longer and Hosta and I got acquainted. After sewing one I loved her even more. 


The Hosta comes in two sizes, and really was designed as a camera bag. The directions include foam camera inserts, but I adore her as a shoulder bag. The two front zippered pockets are the perfect size to stash your keys and phone to keep from having to dig around the inside of your bag. This version was a gift for a friend with two boys and she likes to use it as a small diaper bag when out and about.


I made the large size because I love them. Bigger is better! I did underestimate how big she is, she is a very large shoulder bag and would really work well as a small diaper bag or work bag.  For this Hosta, I used some of my beloved Alison Glass prints with natural cork from Sew Sweetness. I love the blues of the fabric againts the natural cork. 


I also sewed up this colorful version in one of the newest Joel Dewberry prints. This was a custom order and adore the fabrics she chose for this one!


If you have been looking for a new pattern to sew up up that has lots of verstality, you won't be dissapointed with Hosta. She comes together pretty quickly and I love the options you can add. Scoop up your copy of the pattern here. I've also just listed them as a custom order option in my shop if you don't want to sew your own. 


Thursday, February 16, 2017

Introducing Ellen's Esplanade

=

It's pattern release day!

Meet Ellen's Esplanade, the newest pattern by Chris W Designs for her easy street pattern lineI loved sewing up this bag, it's a very quick sew and results in a polished and fucntional shoulderbag that is so fun to carry. At 15" W x  11" H x 5.5" D it's a generously sized bag without being oversized. 


I loved the side pockets, they are cute and super convenient for stashing your phone, keys, and even a small umbrella. I also love that this design element allows you to use up a fun print that you've been holding onto our pairing something fun and bold against a more neutral main panel print. 


For this bag I used essex linen for the exterior and strap, this gorgeous AMH print for the pockets and for the interior I found a beautiful purple peppered cotton that plays against the purple in the pockets.


The interior has a zip pocket, that is very generously sized and the bag construction involves turning the bag through this pocket, a technique that I love. 


The top has a recessed zip closure and is super easy to install. As a general rule, I am not a fan of zip pockets in my personal bags only because I am always too lazy to zip them closed. With that said, I always love the way they look, and I think recessed zips are my favorite!


The recessed zip also allows for a bit of bling by way of the zipper ends. I do love my bling! You can get these zip ends from Emmaline Bags here


I loved how the top stitching thread popped against the linen! It might be my favorite thing about this bag. 


This bag calls for either fusible fleece or foam stabilzer depending on your preference for structure. I opted for the foam stabilizer and I did like the results, but I think if I make it again I would prefer the slouchier look that fusible fleece would give. The only part that I didn't like was that I had used fusible fleece in the side pockets, which flop over at the top with the weight of the hardware when not being carried. Next time I will try fleece on the body and possibly foam on the side pockets to help keep them more structured. 


This bag is a very quick and pleasant sew, it comes together easily and is a great way to try different looks by using various types of fabrics and hardware. I love that the side pockets are functional. 


Head over to read up on the pattern release and pick up your copy here.


Wednesday, January 4, 2017

Calabash Handbag


I'm so far behind sharing my projects! One of my goals in 2017 is to blog more, and stay on track with my projects. I tested the newest pattern by Roarhaus Design Co., the Calabash Bag.  This is the second pattern by Roarhaus, which is the creation of an incredibly talented fellow bag maker and designer Amber. Amber did an amazing write up on hardware for my It's in the Bag! Series over the summer and she is known for her great mixing of fabrics and design elements to make her bags pop. Her patterns are no less stunning. 


The Calabash Bag pattern features both a handbag and a tote bag size. I opted for the handbag size and even this size is a very generously size hadbag and could double as a small tote.  This pattern comes together very easily, and I think a confident beginner would be able to make this pattern.


This bag is chock full of pockets! The front of the bag has a large divided slip pocket, which are quite deep in size. It would be great to slip in your sunglasses and phone with room to put your keys and pens on the other side. 


The back of the bag has a zippered pocket, which allows you to store more stuff without and gives a bit of extra security. There are two side pockets as well, which could easily hold a small water bottle. 


The inside has a full sized zippered divided pocket, that extends all the way to the bottom of the bag. It's secured with a magnetic snap closure and has the option for both vinyl/leather straps as well as fabric. 


I really like how the straps and attached to the bag, I've yet to come across a style like this. The straps are inserted into the strap tabs (you cut a small slit to insert) and then secured with hardware or stitching. It gives a really unique look. To be honest when initially reading through the pattern, I wasn't sure how I felt about this style but now that it's completed I love it!


You can pick up the pattern on Craftsy here and if you don't already follow Roarhaus on Instagram you are msising out on some serious bag inspiration..