Tuesday, August 9, 2016

IITBS-- Jen of Sincerely Jen: How to sew with Vinyl


How is it the last day of the It's in the Bag! series already? What a fun week with some great giveaways and so many awesome tips from bag gurus. For our last day, the queen of vinyl herself, Jenny of Sincerely Jen gives us her tips on sewing with vinyl to take the fear out of adding this to your bags.

Jenny makes the most incredible bags, and many of the Swoon Patterns feature her bags on the cover. She does a fabulous job mixing fabrics with vinyl and other design elements to create stunning and professional looking bags.


If you don't already follow Jenny on Instagram, you are missing out! I always feel inspired to sew whenever I see what gorgeous projects she is working on. If you'd like to order one of her stunning bags, hit her up on Facebook to see what she currently has to sell or to order your own custom bag. 


..................................................................................................................................................................


Hi there!  I'm Jenny, from Sincerely, Jen, and we're going to talk about vinyl today!  I was honored when Cyndi asked me if I'd be willing to write a post on sewing with vinyl.  I've been sewing bags with vinyl for a few years now.  Usually they just have vinyl accents (typically per the instructions of my #1 favorite, Swoon Patterns.)  When I was asked to do this blog post, I figured I better make an all vinyl bag so I could at least feel qualified ;)

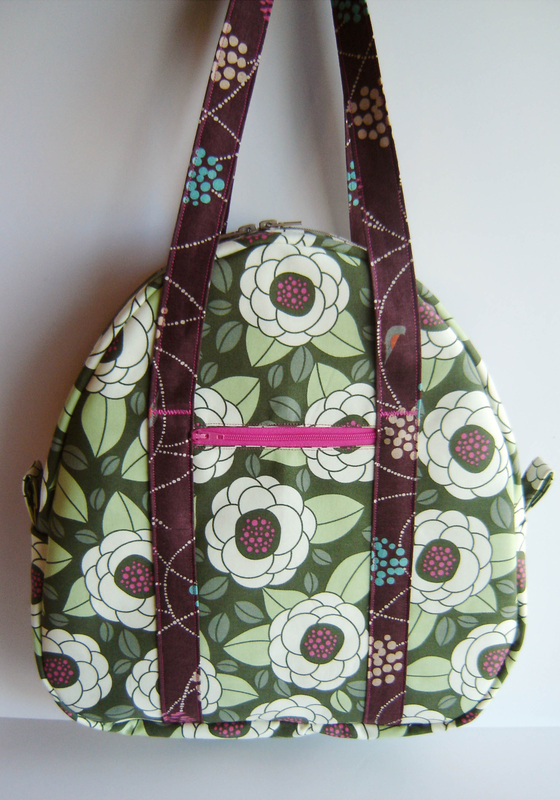
This is the Blanche Barrel Bag.  Pattern by Swoon Sewing Patterns.


Since sewing with vinyl is always surrounded with so many questions, lets do this in a Q & A format!  I posted on Instagram a few days ago asking for questions about vinyl and everybody was so helpful!  Now I'll try my best to answer the most important questions to the best of my ability.  My way may not be the "right" way, but it is what works for me!

First things first, what is the best vinyl to purchase for sewing bags?

When I'm shopping for vinyl, I usually like to buy it in person so I can see what I'm getting.  You want an upholstery vinyl, so it is heavy enough to hold up in bag making, and it doesn't have much, if any, stretch to it.  I have a local shop where I buy a lot of my vinyl, unfortunatly they are not online.

This is the type of flannel backing you are looking for.
However, I buy my most favorite vinyl at JoAnn's, and you can find it here - this vinyl has a flannel backing, which is what you want to look for.  I find that most marine vinyls are too thick and stiff for bag making - my only exception to this is glitter vinyl, of which I prefer the marine vinyl variety (I buy that from Fabric.com).  In my experience, with vinyl, you get what you pay for!!  I love looking for a good deal as much as the next guy, but don't scrimp on your vinyl!
You DO NOT want this!! The backing seems
like a quilt batting and the vinyl feels like thin plastic.


What sewing machine do you use?

My main squeeze is my Juki DDL-8700.  It is an industrial machine and she is a beast!  I go through several layers of vinyl on this machine and have no problems at all!!!  (Just look at all those layers!)


For years, I sewed all my bags on my Brother PC420.  It is an electronic domestic sewing machine.  I wouldn't dream of sewing an entire vinyl bag on this machine, but I've made several bags with vinyl accents on this machine with no problems! (Especially if you get the Jo'Ann's vinyl I linked above!)


What needles do I use to sew vinyl?

   For my domestic machine, I use Schmetz Size 18 Leather needles.

   For my Juki, I use Organ DB X 1 size 16 needles.


Do you use special feet for sewing vinyl?

The foot I would most recommend for sewing vinyl is a Teflon foot.  It has a non-stick coating on the bottom that helps it to glide across vinyl easier.  There are also roller feet that are useful in this application, however I have not used one before.  With my Juki, I use the regular metal feet with no problems with most vinyls.  Test the foot you want to use on a scrap of your vinyl to see if it sticks before sewing your bag.  If your machine has an adjustable presser foot pressure (say that 5 times fast!) I notice that it is helpful to reduce the pressure on the foot and that helps the vinyl to glide more easily as well. 
These are both Teflon feet (see the white coating on the bottom?)  The one on
the left is for a domestic machine, and the one of the right is for the Juki.
I have also heard many recommendations of using a walking foot to help your vinyl feed more easily and evenly.  This is a walking foot for a domestic home sewing machine.  I'm not even sure if there is one for my Juki (I'd like to know that if there is!)


What kind of thread do you use?

I just use what my machine likes!  With my Brother, I always used Coats and Clark.  My Juki loves Gutermann thread!  If I know what colors I want, I order Mara 100 from Wawak.com.  Most of the time, I just buy Gutermann polyester Sew-All thread from JoAnn's - it is very close to the Mara 100.  If I want a nice thick top-stitching thread, I buy the Gutermann's top-stitching thread they sell at JoAnn's.  

While we're talking about thread, I use a stitch-length of 5 for top-stitching with the heavy top-stitch thread.  If I use the other threads for top-stitching, I use a stitch-length of 4.  For seams, I usually use a length of 2.5. 

Left:  Gutermann 100% Polyester Top-Stitching thread
Center:  Gutermann 100% Polyester All Purpose Thread
Right:  Gutermann 100% Polyester Mara 100


You can't pin vinyl (because the holes will be permanent) so what do you use instead?

Wonder Clips and Tanner's Bond Double Stick Tape are my two favorite things when I can't pin!


I use the double stick tape for things like making handles or piping.  

For handles:  Draw a line down the center of the handle pieces.
Add a line of double stick tape along each side of the line.  Press
well and remove the paper backing.  Fold each long edge in to the
center and press well along the DST.  
With both long edges folded to the center, add one more line of DST
along one of the folded edges, then fold in half again.  Then just top-stitch
along each long edge of the handle at a 1/8" seam allowance.

Wonder clips are best for holding parts together.  Like holding the piping on and holding the ends to the main body.  Just pull them off as you sew!

Not enough time to go into the complete how-to of making vinyl piping in this post,
but if you try it, make sure you clip into the seam allowance so it fits nicely around
the curves!
I also LOVE to use glue sticks with my vinyl!  Just regular glue sticks (this one was left over from the 16 my son needed for Kindergarten last year).  I typically use the glue stick to adhere overlays and handle connectors to the bag.  Cover the entire backside of the overlay, press it in place, let it dry for just a little while, and it stays in place nicely for you to sew!


Do you interface vinyl and can you iron it?
As far as interfacing vinyl is concerned, sometimes you do and sometimes you don't!  I do not add interfacing to handles.  As long as you have chosen a quality vinyl, it will be sturdy enough to hold up for your handles.  If you think it feels a little thin, then go ahead and add a layer of fusible woven interfacing (Shapeflex SF101).  For bag that need to hold their shape, such as the Swoon Blanche that I sewed all in vinyl, you will still want to use the foam interfacing and the stabilizer in the bottom panel.  Basically, you will still interface if it is meant to give the bag shape.  If the interfacing is only intended to make the fabric a more heavy weight, then you can skip it.

I use wonder-under fusible webbing to adhere my foam to by vinyl or fabric when I'm sewing bags.  Never touch the hot iron to the right side of your vinyl, IT WILL MELT!!!  I iron the wonder-under to the vinyl from the wrong side.  Then I place the foam over the wonder-under, place a pressing cloth over the foam, and iron the foam to the vinyl.  I have pressed many different vinyls from the wrong side and haven't melted any yet.  Of course, try a scrap of your vinyl first, to make sure it can hold up to the heat.  

Wow!  That was a lot of information!  I only covered the basics here, and tried to answer all the questions I am asked most often.  I could go on all day with more specifics, but will have to save that for another time.  I hope this is helpful to you and hope that you feel a little more comfortable working with vinyl now! 


IITBS-- Marci of Marci Girl Designs Explains how to Reduce Bulk


Today's guest blogger is Marci of Marci Girl Designs. Marci is an all around sewing pro! If you follow her on instagram you know what I mean. She always creates the most incredible quilts and gorgeous bags. I always love to see what she is working on, the end results are so stunning.

Star Crossed love bag
Stashtacular Clutch


Rebecca Bag
Two in One Tote

Go follow her on Instagram for some inspiration in your feed, and follow her blog here.


Hello, this is Marci and I'm happy to be here today.  I blog at Marci Girl Designs and you can find me on Instagram @Marci_Girl.  Today I want to share what seems to a be a very boring topic, reducing bulk (or maybe you have no idea what I'm talking about.)  But trust me, it may seem boring but by reducing bulk in your handbags you can create a professional looking bag, it takes only a few minutes and in the end makes the sewing process easier too. Win, win.

I will start with my secret weapon, sewing scissors and pinking shears.  Now many of you may not own pinking shears, but trust me, they are well worth the investment.  Traditionally pinking shears are used in garment sewing and used to "edge finish" interior seams of a garment.  The little zig zag that is cut on the seams reduces fraying and raveling of the finished product.  That will also be the effect created in bag sewing but more importantly it helps create rounder, smoother corners and reduces bulk.  Once you own a pair, you will find a million and one uses for them.


Now that I have shared my secret weapon, I will talk about the different steps or parts of the bag making process and how to reduce bulk on these parts, thus creating a more professional looking bag.  The following photos are process photos that I took during the process of testing a yet to be released bag pattern.  The only reason I am showing these photos in this order is because this is the order in which I constructed the bag.  But this order has no bearing on the information being discussed, and any of these tips can be used at any or on all steps of the bag making process.

Let's start with the interfacing, as this is really the first step with reducing bulk.  Below you will see a photo that shows two pocket flaps, both in different stages of completion.  The pocket flap to the left has been cut from the pattern, full size.  The pattern calls for this piece to be interfaced with Pellon SF-101 which is a woven iron-on interfacing.  Any time I have to cut out interfacing (iron on or sew in) I cut the interfacing smaller than the pattern piece, usually 1/4" smaller if the seam allowance is 1/2" or larger, which it is for this pattern.  Two reasons for doing this:  The first is obviously it reduces bulk in the final product.  The second reason aids in the process of ironing.  If the interfacing is smaller than the cut piece of fabric you reduce the odds of getting the glue on your ironing board or iron.  See, win, win.  So you can see on the flap to the left, my interfacing is cut 1/4" smaller on all sides, ironed on and then once the two flaps are sewn together (right sides together) the interfacing is still caught in the seam.

Now that the seam is sewn, it is time to trim the seam before we turn the flap to the right side.  Usually a pattern will call for you to clip corners and maybe notch or clip the round edges.  As you can see with the flap to the right I have clipped the corners close to (but not too close) to the upper corners, I start with cutting 45 degrees off of the corner, and then went even further and trimmed the corners on the top and to the bottom of the corner at a gradual angle.  Now that the corners are trimmed, it is time to use those pinking shears.  Here I trimmed all of the edges to 1/4" with the pinking shears and on the two bottom round corners I used the pinking shears to trim 1/8" from the sewn edge.  By doing this you will have a smooth round corner without having to clip or notch anything.  Quick and easy.


The photo below is an exterior pocket that is constructed with the main fabric which is interfaced and lined with the solid blue fabric.  You can see the interfacing has been trimmed before ironing on and the corner has been clipped (in the lower left hand corner.)  To reduce bulk even further I trimmed the lining fabric to 1/8" from the seam and used the pinking shears to trim any edges that have curves.  The right hand side of the pocket has yet to be trimmed (corner and curve.)


A construction technique that I almost always deviate from the pattern is when it comes time to making straps, handles and strap loop pieces like shown below.  Usually the pattern calls for a 4" wide piece of fabric, interfaced, ironed in half and then the raw edges ironed in toward the middle to create a 1" wide strap.  You then top-stitch on both edges, thus closing the open side and creating matching stitches on the opposite side.  Any time that I can I sew a tube instead, turn the tube right side out and place the seam in the center, as shown below in the flat piece to the right.  Now that the bulky seam is in the middle, you top-stitch on either side , slip on the piece of hardware, fold in half and pin.  You can't even see that center seam and you didn't have to stitch through that bulk.


The photo below shows another example of this.  This is a handle that was supposed to have that seam on one of the edges, but by making a small change I was able to shift that seam to the middle (which in the end will be completely hidden)  This change makes sewing the handles so much easier on your sewing machine and when attaching these handles to the bag the center bulky seam is easier to attach than having that bulk on one of the edges of the handle, trust me, so much easier and creates a more evenly attached handle as well.


This bag that I was testing used both Pellon SF-101 and Annie's Soft and Stable interfacing.   Below you can see that I am constructing the main body of the bag and this particular bag has rounded corners. I have already trimmed the interfacing before ironing it on.  This corner right here is two layers of canvas fabric, 2 layers of SF-101, 2 layers of Soft and Stable and sandwiched in between is hand made piping, so 2 more layers of fabric, for a grand total of 8 layers of fabric.  It's a lot of bulk and on these seams you just have to sew through them all.  But once you have sewn this seam and are happy with the finished product and how the piping looks it is time to deal with that bulk.  Look at how that corner looks below.  Not very round, really bulky and when you turn this to the right side it will be a mess in the corner.


The solution is shown below.  I start with trimming the Annie's Soft and Stable all the way off right up to the stitching with my regular sewing scissors.  I then trim both the canvas and the piping to 1/4" away from the seam (not shown here.)


Ideally my next step would have been to use my pinking shears to trim around those corners to make a smoother corner, but for whatever reason I forgot and just trimmed the canvas and piping with my sewing scissors, shown below.  Another great step would have been to trim one side of the canvas and piping 3/8" away from the seam and the other side 1/4" away from the seam creating a seam that is graduated.  By creating graduated seams it reduces the bulk on the interior, which is really useful in a piece that has this many layers.  Even though I didn't do that in this piece you can still see below how improved this corner is now versus how it looked in the pictures above.  Much smoother, right?


The photo below illustrates just how much material was removed from trimming just one side of the sewn handbag.  Look at how much bulk was removed, almost 1/2" of Annie's Soft and Stable and 1/4" of the canvas and piping material.  Better for all of this bulk to be in the trash instead of in the inside of your bag.


Now that we have trimmed all that we can and finished sewing the bag it is time to turn it to the right side and see what we have to work with.  At this point I was going to talk about the importance of ironing and how to use a towel to aid in this process, but since this was discussed at length on day one of this series I will direct you to read Margareth of Maggie Made Bags post and all of her wonderful advice on the subject.  She really hit the nail on the head and this is exactly what I do as the finishing step with my handbags.  Below you can see my finished product and I like to think it is professional looking.  Nice smooth curves, just enough body because of the amount of interfacing used, ironed nice and flat.  What do you think, professional looking?  I hope so and I know you can do it too!  Thank you for joining me today and thank you for having me Cyndi.


IITBS- Swoon Patterns Giveaway


Today's giveaway sponsor is Swoon Sewing Patterns. Swoon Patterns are easy to follow, feature clean and professional details and are easily modified but advanced bag makers. The pattern catalog features a wide variety of patterns from beginner to advanced and from wallets to overnight bags. Many of the designs feature professional details such as vinyl and accent pieces that don't make any of these bags look homemade. 

My absolute favorite Swoon is the Betty Bowler, which was recently given a face lift: 


The newest pattern in the Swoon catalog is the Sydney Cross body bag: 


Swoon Patterns is also a contributor to the Bag of the Month Club, which is a subscription that gives you a new pattern each month from one of 6 incredibly talented bag designers. 

The Brooklyn handbag and traveler was the contribution for the previous subscription, and oh my is this bag a STUNNER!


The Swoon blog also offers many great tutorials and sew alongs. There are so many gems for bag lovers here! The Swoon Patterns Facebook group is also a great place to find inspiration, get support and just connect with other bag addicts. This is a great group of sewists, and so many helpful people. 


One lucky winner will receive 3 pdf patterns of their choice from the Swoon catalog. There is certainly so many options to pick and it will be hard to pick just 3!! 


a Rafflecopter giveaway

Monday, August 8, 2016

IITBS: Wendy of W.D. Hanbags How to get Professional Results on your domestic machine


Next up in the series is Wendy from w.d. Handbags. Wendy creates some of the professional looking handbags I have ever seen, I am always blown away by the incredible bags she creates and her use of hardware and bling to make her bags stand out and demand notice. 


See all that vinyl?! Wendy does that all on her domestic machine! When I approached Wendy to write a guest post for this series, I specifically asked her if she would be willing to dish her secrets on how she gets those amazing results without an industrial machine. Her details are absolutely perfect, and her top stitching is just stellar. I was so glad when she agreed! I know I'll be pulling out all her tips in my sewing room! Check her out on Instagram to see all the yummy bags she creates.


...............................................................................................................................................................


Hi everyone! I'm so excited to be taking part in this awesome series! I'm flattered to be included among this fantastic group of ladies. 
So, today we're going to talk about how to get professional results using your domestic machine.  Personally, I use a Kenmore sewing machine and I think you can get great results with your domestic. Am I considering an industrial? Sure, but they're a big investment so in the meantime these are some tricks I've learned over the years of sewing handbags & wallets...
Stitch Length-The typical range for stitch length on a domestic machine is 0-4mm, sometimes up to 6mm. Most machines have a default setting of 2.5 mm (10-12 stitches per inch). Obviously, the smaller the number the smaller the stitch. Smaller stitches are harder to rip out and can cause damage to your fabric, I generally sew my bags with a stitch length of 3.0.However, when top stitching I like to use a length of 3.5mm on fabric, and if I'm using vinyl I like to use a length of 4.0-4.5mm. It gives a nice even smooth look, especially if I'm using a top stitching thread.
Pressure Adjustment-On most machine there is a place to adjust the pressure on your presser foot, it comes in handy to know these settings when sewing lots of layers for your bags. On my machine there's a dial on top that has 3 settings- 1 is for Extra fine fabrics (It puts more pressure on the foot so your fabric will feed through evenly) 2 is for appliqué, and 3 is the regular setting. These are important settings to look at if you're having tension issues (coming up next). 
Tension - Speaking of tension issues... have  you ever tried to sew something and the thread just bunched up on the bottom of your fabric or just looked wonky? You really need to know how to adjust the tension of your machine-and don't be scared of it! I will often have to change the tension when using different materials (fabric or vinyl) for one bag. When the tension on your machine is balanced the stitched lines look even on both sides of your fabrics. Threads Magazine has a great article on tension...
78-thread-tension-03
"When upper and lower thread tensions are balanced, knot between top and bottom threads is hidden between fabric layers (top). When lower tension is too loose (or upper tension is too tight), knot is visible on right side (left). When upper tension is too loose (or lower tension is too tight), knot is visible on wrong side (right)."
Seam Jumpers- Have you ever had a thick seam that you're trying to sew together and your machine just won't forward the fabric through the feed dogs? A seam jumper is a great little tool that can help you out. You set your presser foot on top and it will hold it up to the same level as your thick seam and your machine will glide right through and your machine won't chew up your fabric! 

seamjumpera_WeaverDee.png


(image from weaverdee.com)
Needles-There are so many options of needles how do you choose the right one?  11/80, 18/110, 16/100, 14/90... what do they all mean? I like to use a heavy duty universal needle when I sew my bags. Selecting the correct needle for your project is just as important as selecting the fabric, thread and stabilizer. There are different sizes and types of needles for different types of fabric. The European metric sizing system for sewing machine needles is numbered from 60 to 110. The American sizing system is numbered from 8 to 18. For both sizing systems, the lower the number the finer the needle and the higher the number the larger the needle. Most needle companies show both sizes on the package.
A good rule of thumb to keep in mind: the lighter the fabric the smaller the needle size and the heavier the fabric the larger the needle size. 
needleSizeList.jpg


6. Etcetera -My last tips are bits and pieces, mostly for the inside-generally the part that no one is ever going to see but can make or break  your bags. 
Seams.. I always, always, always press open my seams (unless using vinyl of course-but even then finger press!). I also like to top stitch down those pressed seams when I can then trim the excess inside to reduce bulk for top stitching around the bag later. 
Using the right interfacing is important.. I know we all have our favourites (I'm a sucker for foam interfacing - I love the look and structure it gives a bag) but if you're not sure what to use.. PLAY. Seriously, some of my favourite bags are when I switched up what was called for in the pattern, now keep in mind you may need to make some other adjustments to the pattern so it's best to do it with a pattern you are familiar with. 


I really hope these tips were helpful! If you have any questions or have any additional tips, let us know in the comments below!
Signature


IITBS-- Cindy of Raspberry Sunshine Handbag Straps


Today's guest blogger is Cindy of Raspberry Sunshine.
Cindy is an incredibly talented bag maker, bag designer, sewist and blogger. I met Cindy through pattern testing for Sew Sweetness and I have always been blown away by the incredibly gorgeous bag she makes. She has also designed her own bag pattern The Diane Tote:

Cindy's blog is a fantastic resource for all sewists, but especially fellow bag lovers. She offers various tutorials and helpful tricks to step up your bag game. 

In addition to designing and blogging, Cindy also has an Etsy shop that features fabrics and handcrafted bags for sale. 

You can find Cindy through her Blog, Facebook or Instagram. I'm so excited to have her joining us today!

...................................................................................................................................................................


To me, straps are one of the most important parts of a handbag.  Not only do they need to be comfortable enough to hold by hand, arm or shoulder, they will be carrying A LOT of your bag weight.  So making your straps long lasting is very important!

If you are following a well written pattern, the designer has (hopefully) included strap instruction best suited for the design.  But if you are drafting a pattern of your own or maybe want to go rogue and modify the straps in a pattern,  give these options a try!

** Tools I have on hand when making any sort of strap: Dead Blow Hammer (pounds the heck out of a thick area!) , Scrap Cloth (put down before hammering), Fabri-Tac, Iron, Clips.

Fabric - One of the most popular methods of making straps at any skill level is what I call the double fold method.  This works best for most fabric types. The thinner to mid-weight fabrics will need a piece of fusible interfacing along with it ( I use SF101) to add stiffness. The thicker home decor or upholstery weights usually don’t.
To figure out finished width I take the finished width I want and multiply by 4”. Example: If you would like a 1″ strap, you need to cut your fabric 4″ wide.

  1. Fold length of fabric strip in half and press to create a fold line.
  2. Open fabric strip.  Take each long unfinished end and fold it towards the center and press.
  3. From step 3, fold in half lengthwise again and press.

From here, I typically stitch 1/8” from each end to finish, but a nice double stitching on each side or every 1/4” or so works great too!
Once you make a strap like this, you can attach it many ways.  Rivets, Grommets, Sewn into the bag itself, or sewn on top of the exterior. The possibilities are endless.

Below, I used a tab with a rectangle ring to attach my strap.  This is popular for cross body straps (On Left).  To avoid an unfinished look on my strap ends, I tucked each short end in 1/4” and pressed before I folded the fabric. From there I just loop it through the ring and stitch an “X” to finish it off.

Another very popular method of strap attachment is this type of tab (On right) This is sewn onto the front of your bag where the straps will go through the top of the ring and stitched or riveted to secure.

Go thrifting!  Yes,  some bags may be old and crusty, but that doesn’t mean their straps are!!  Take apart that old unused bag and reuse!  This option works best for vinyls, leather or webbing that can be easily cleaned up.  (Get the hardware too while you’re at it!!)
Webbing - Easy to purchase in most craft stores in a variety of sizes (the pic on the right is a 3pk belt from TJMAXX!), webbing is a great option for any bag that will be seeing a lot activity (Large totes, beach bags, backpacks, etc). I typically use a thicker cotton when I use webbing on handbags but the Poly and Nylon are great solid options. Note that most webbing will need some sort of fray-check, glue or fold under technique to seal edges.

Wooden -  These are harder to find, but I have seen many styles at our local JoAnn’s and online.  Unless your pattern includes how to attach these, wooden handles will require some sort of tab, hardware or fabric piece that will ultimately wrap around the  area then be stitched into the bag.

Leather -  Oh, how I love leather!!  If you’re looking for a classy and simple strap to use on your bag give leather a try!  You can sew it into the top of your bag or if you are comfortable with rivets, a double cap rivet (or two) can be used to secure it to your work.  Leather can be a bit stiff to work with, but softens as it ages.  

Straps can be purchased ready to use, or you can cut it to your desired length and width. How about that thrifting you did?   A nice softened leather belt can be cut down to make great straps too!

* WARNING!*  Practice before you sew.  Leather does not forgive.  Sew slow and take your time and if you can, practice with scraps before starting a big project.
Vinyls  

Vinyls of all sorts are the ‘big thing’ right now in handbag design.  Marine Vinyl, Glitter Vinyl, Upholstery Vinyl.  All are readily available online and in stores (Glitter is a little trickier!)  The success of vinyl products in your handbags depends on these :  Needle size, Thread size, Walking Foot or Roller Foot and thickness of vinyl.  

Your specific machine (instruction guide) will tell you what it needs for needles and feet, but when you sew with vinyl thread typically is a bit tougher and thicker.  Gutterman Upholstery Thread and Bonded Nylon tend to be my go-to, but your machine may require different.

* WARNING!*  Practice before you sew.  Leather does not forgive.  Sew slow and take your time and if you can, practice with scraps before starting a big project.

This is my go-to tutorial for vinyl straps. I’ve been using it for years and it never fails.


Thanks for stopping by today for the IITBS! I know many of you have used or seen these techniques, so do you have any tried and true tricks for strap construction? What is the most unique material you’ve used for straps?