
Today's post is from Crystal from The Cloth Albatross. Crystal is an incredibly talented bag maker and sewist and I am always in awe of what she creates! She makes absolutely stunning bags and I love the way she uses design elements and mixes fabrics to make her bags pop!
Check out some of her crazy awesome bags:


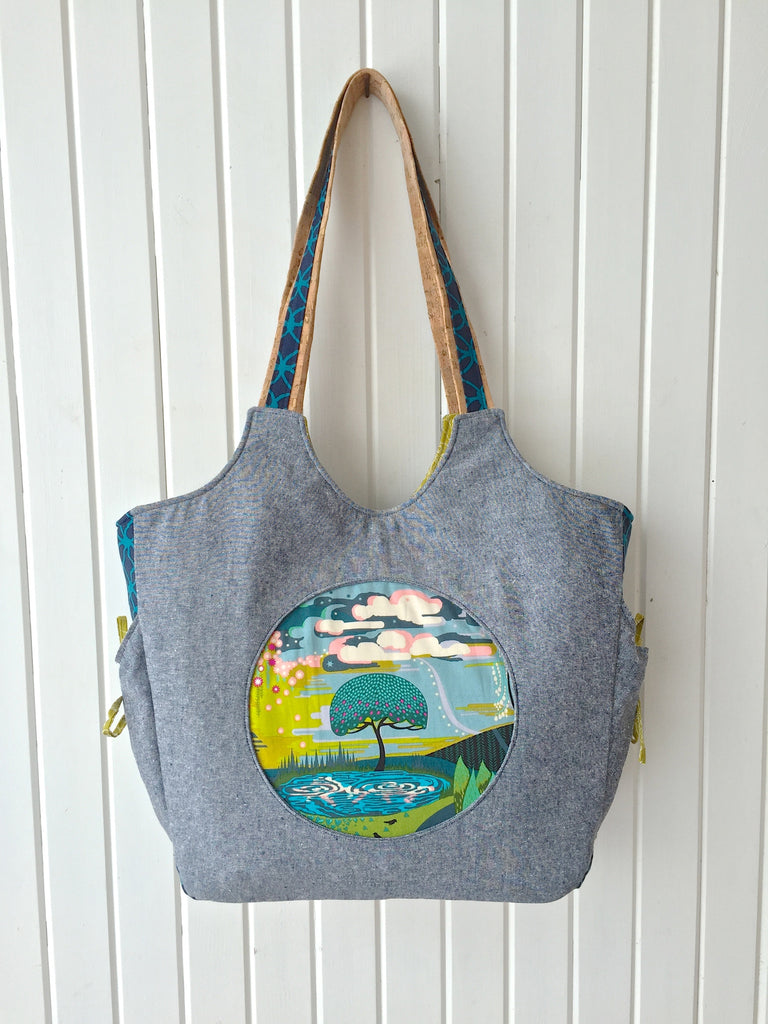
When I first asked Crystal if she would be a part of the series, I immediately thought of some of the gorgeous QAYG bags she has created, this was one of my faves:

In addition to sewing up these gorgeous bags, Crystal has also designed her own bag pattern which was published by Blue Calla Sewing Patterns. You can get your copy here, or head over to The Cloth Albatross Shop on Etsy to see what yummy bags she currently has for sale
You can get your copy here, or head over to The Cloth Albatross Shop on Etsy to see what yummy bags she currently has for sale
.......................................................................................................................................................
Hi, I’m Crystal of the Cloth Albatross. I am so excited to be included in this bag making series. In this tutorial, I’ll go through the method that I use for incorporating quilt-as-you-go (QAYG) into bag making.
Initially, I was going to write up a simple tote pattern but then I realized that Sara of Sew Sweetness has already written a free tote bag pattern using batting as interfacing, and it’s adorable. Here is the link to Sara’s Sawyer Bag tutorial.
I really like the proportions of the Sawyer Bag with the handle extenders giving it a unique look. I decided to accentuate that feature by having a top band, that ends where the handle extenders do, connected to a QAYG panel.

After you’ve looked over the Sawyer Bag tutorial, look back to the supply list and make the following changes:
- You will only need 1/4 yd exterior fabric
- Change ShapeFlex quantity to 1 1/4 yds
- If you have batting scraps, you will not need to purchase batting yardage.
- Omit Pellon 805 Wonder Under (since we’ll be quilting our batting, we do not need to fuse it to our exterior fabric)
- Add 1/4 yd Pellon Fusible Thermolam Plus (fusible fleece)*
*The fusible fleece is for interfacing the top band. If you don’t have this on hand, you can use Wonder Under to fuse batting, or quilt batting to the top band. Basically, use what you have or the supplies that you’re most comfortable working with.
Cutting and Interfacing Top Bands
Exterior Fabric:
Cut (2) 9” H x 16” W
Shapeflex (woven interfacing):
Cut (2) 9” x 16”
Fusible Thermolam Plus (fusible fleece):
Cut (2) 8” x 15”

After you’ve cut your fabric and interfacing, fuse the Shapeflex to the wrong side of your exterior fabric. Once the Shapeflex is fused, center the fleece over it. The fleece should be 1/2” in from each side so that it stays out of the seam allowance (SA) and reduces bulk.
Piecing/Cutting Batting
If you don’t have batting scraps and are cutting your batting from yardage, cut (2) 11” x 17” pieces. You will be trimming these pieces down to 10” H x 16” W after they’re quilted. Quilting tends to distort fabric, so the extra inch on each side gives some leeway for it to be squared off once you’re done.
If you’re piecing your batting, take 2 strips to your cutting mat and overlap them by ~ 1” on their longest edge. Cut along the overlap. This cut will make the batting scraps easier to butt up against each other when you join them together.

Take your batting pieces to your sewing machine. Put on your walking foot attachment and set your machine to a joining stitch. On my Janome, I use stitch #16. A zigzag stitch would also work. Center the seam of the 2 batting pieces in the center of your walking foot. Guide both pieces through as you stitch. The batting may get a little wonky – that’s okay. It doesn’t need to be perfect since we’ll be squaring up our panel once we’re done quilting.

Join batting scraps together until you have (2) 11” x 17” batting pieces.
If the seam in the batting makes you uncomfortable, you can fuse a scrap of SF101 over the seam. I don’t usually do this if I’m quilting something but it doesn’t take much time.

Choosing Fabric Scraps
I like to choose a theme when I’m doing QAYG so that it doesn’t seem too random. Since I am using B&W fabric for my top bands, I chose a B&W focal print to match. I decided to do solids with it. I didn’t want a rainbow look (this time) so I opted to go for cool color solids. You could do rainbow, warm tones, geometrics, or florals. Really there are no rules, just choose scraps that you will be happy working with.

It would make more sense to choose a central design that’s wider than it is tall since the QAYG block is a wide rectangle. So take that into consideration when choosing your central design. The reason this is important, is that we will be doing log cabin style piecing (going around a block in the center with strips on the outside) and the tops and bottoms of your block will get completed before the sides do since there is more room on the sides. It’s not a big deal – you can just add strips to the sides, but if you want the same number of strips on the top and bottom as on the sides, you’ll want to use narrower strips on the top and bottom and a wide rectangle for your center design. This sounds complicated but it’s not and will make more sense after you look at the pictures of how the block is laid out.
QAYG
Take your (2) 11” x 17” batting panels and mark a 10” H x 16” W square in the center. This is not necessary but it will help you see approximately where you will be trimming your panel down to so that you don’t do a lot of unnecessary quilting that won’t be seen. While you’re marking your square, mark the very center of the panel so that you know where to place your central focal square.
Place your focal square, right side up, in the center of your batting. You can pin it or spray baste it in place if you’d like, but I normally just hold it in place until I quilt it. Change your stitch length to at least 3.5 mm and decide how you want to quilt your design. I chose to quilt my central square differently than the rest of my panel. I used diagonal lines on it and vertical and horizontal lines on the side strips. I don’t mark my lines on smaller projects, but if you want really straight quilting lines, you can use painter’s tape to mark your lines. It’s repositionable so that you can use the same piece a few times. Just stick it on the top of your project and quilt right along the edge of the tape. I normally just pick a place on my walking foot and use that as a guide for how far apart I want my quilting lines.


After you’ve quilted your central square, measure the top edge and cut a fabric scrap to that length. The width of it doesn’t matter – it’s a personal preference on how wide or narrow you want your strips. I kept the width of my strips between 1.5” and 3”. (I varied their widths.) Place your fabric strip, right side down along the top edge of the central square and sew it in place with a 1/4” SA. Press the SA toward the top strip and quilt the strip.


Once you’ve quilted the top strip, measure the right edge of your quilted piece and cut a strip to that length. Lay the strip right side down along the right edge and stitch with a 1/4 SA. Press the SA towards the right strip and quilt.


Once you’ve quilted the right side strip, measure the bottom length of your quilted piece, cut a strip to that length. Sew the strip with a 1/4 SA. Press the SA towards the bottom strip and quilt the bottom strip.
Once the bottom strip has been quilted, measure the length of the left side of your quilted project. Cut a strip to that length. Sew the strip to the left side of your project with a 1/4 SA. Quilt the strip.


Now we’ve made it all the way around our central square. We’re going to continue this pattern until we’ve quilted our entire piece of batting. Since we haven’t been completely exact with our cutting and measurements (or at least I wasn’t), there will be some pieces that jut out, that’s fine, they will get quilted over. Just make sure to align your fabric strip against the most sunken in piece so that there are no raw edges peaking out from your quilted block.

After your batting is completely quilted, take it to your cutting mat and trim it to 10” H x 16” W. Your QAYG panel is finished!

Finishing Main Panel
Get your top bands. We’re going to piece them together with our QAYG panels. Place a top band right side together along the top edge of your QAYG panel. Stitch together with a 1/2 SA. Press the seam toward the top panel. Topstitch the seam ~1/8” from the edge.


Now your exterior main panels are finished and you can proceed with Sara’s Sawyer Bag Tutorial. I hope that you found this tutorial helpful and that you’ll make a QAYG bag. If you do, make sure to share it on Instagram with the hashtag #sawyerbag.


8 comments:
Love it! Thanks!
Great idea I'll need to incorporate this in the future
I love all the bags you make, Crystal! Especially last year's BOMC Carpet Bag - perfect example of a QAYG bag! Thanks for this tutorial - hope I can do it justice....Chris
What a fun bag to add QYAG too.
What a lovely bag to make now I have been shown how to do it
What a lovely bag to make now I have been shown how to do it
Love your bags! Soon I want to get some stuff and get making!
If you’re in Maharashtra, BOPP bags manufacturer in Mumbai delivers packaging solutions that combine functionality and style. Their bags feature superior lamination, vibrant prints, and high durability, suitable for industries like agriculture, retail, and manufacturing. They provide tailored solutions to match your business requirements, ensuring products are well-protected during storage and transportation. Known for timely delivery and excellent customer service, they help brands maintain a professional and appealing presentation in the marketplace.
Post a Comment