
Our second guest blogger today is Katherine of PfitzSewSwell. I discovered Katherine on Instagram as fell in love with her use of color and her professional looking bags. I don't think I have seen a single bag with her that I have not been just blown away by. Seriously, see what I mean:


Katherine just launched her website and blog, and you can order one of her incredible creations if you'd like a handcrafted couture bag and don't fancy making your own. Go check out her new site and her Facebook page to see all of her stunning creations!

I’m borderline obsessed with bag-making.
I learned to sew when I was a kid, but rekindled my love for it in February 2015. I searched Pinterest for HOURS trying to find the perfect cross-body bag, and finally found a pattern by Chris W Designs that I loved.
But then, I had to make another bag. And then another, and another. Finally, I decided I could turn my passion into a business!
Now, I get to sew custom, one-of-a-kind bags for others on a daily basis and I’m fortunate enough to test bag patterns for Chris W Designs and Cloudsplitter Bags & Designs.
So...sewing curves.
Does that intimidate you?
It did for me, for a long time.
You see, I have this way of overthinking EVERY. Single. Step. In a pattern.
I used to spend literally hours on ONE bag’s bottom or side gussets.
Now, I can finish in just a couple minutes.
What?! How can you do that?!
Well, let me share with you some of my favorite tips below! :)
#1: What the heck is a convex and a concave curve?
I thought about how to best explain this, and I think the alphabet is a simple example you should be able to remember.
The letter "m" has TWO convex curves in it. See them? Yep, I thought so!
The letter "w" has TWO concave curves in it. (You’re like, thanks, Captain Obvious! insert eye-roll here)
But, to make things super simple, I've included a picture for all you visual learners!

This is SOOO easy, you guys, and I don’t know why I didn’t think of it sooner.
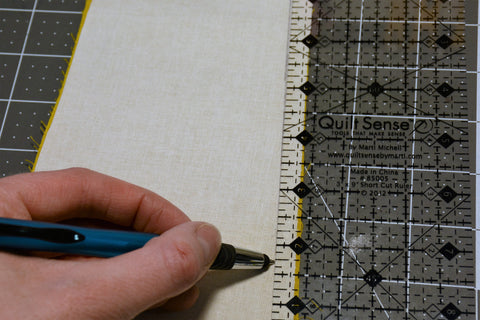
#2: Mark your seam lines before you do anything else to the pattern pieces!
I use my handy-dandy 3” by 9” quilting ruler to mark every couple of inches around the curve. Then, I connect them by rotating my ruler as I draw the line on. I typically cheat by using a regular ballpoint pen for this, but make sure it’s a light color that won’t be seen on the other side. There have been too many times I’ve used another type of pen or marker, only to see it’s disappeared after all my hard work! And it isn’t fun to redo it at all.
Up next, we’ve got the all-important stitch length!
Wait, this can make a difference? Heck yes!
#3: SHORTEN your stitch length before sewing a curve.
Before you even start to sew the curve—like when you’re leading up to it—shorten your stitch length to about a 2 or 3. This will create more stitches (duh!), strengthen your seam around the curve, and hopefully prevent you from having to rip everything out and try again (which I’ve done. MANY. Times. Not fun.).
#4: Match up key points on each pattern piece, easing the fabric to get nice and close to the other pattern piece.
This is one step I’ve overthought again and again. Here are a couple points to remember:
- Find the centers of your pattern pieces by folding wrong sides together and pressing. For vinyl, leather, and all fabrics that might melt to your iron (no, no, I’ve never done that! ;)) use a seam roll, the blunt edge of a ruler, or finger press.
- Match up your centers (always do this first), then match up the top edges if you’re sewing on a gusset, or the opposite corners if you’re sewing an ovular or circular base. The curves will ease more equally, and your bag will look way more professional!

- Because convex (“m” curves) naturally have more fabric, they’re going to be wont to pucker. So, as you're easing the curve, make sure the seam lines you drew earlier match!

We’re lucky enough, as a community, to be located all over the world. This means that our seam allowances differ quite a bit in size. Here’s the bottom line:
#5: The greater the seam allowance, the more likely you are to get puckers in those beautiful curves.
I have two tips to help prevent this puckering:
- Consider trimming your seam allowance down some so that you have less fabric to work with. I trim my seams to ¼” before I match them up, and have much better luck when sewing.
- Because one curve (the "m" curve) has more fabric, I use my pinking shears to cut at the very edge of the raw edges to allow some more easing into the curves. Rather than trimming slits in one curve and cutting out slits in the other curve, I use the pinking shears on both curves put together.

#6: As I see it, there are four ways to match up curves and sew them together.
I’ve tried them all and I have two favorite methods.
- Eyeballing it and holding the fabric together with my fingers as I sew around
- Using pins to hold fabric together

MY TWO FAVORITE METHODS—I know you’ve all been on the edge of your seat in anticipation of these tips!
- I use the ever-amazing Wonder Clips for EVERYTHING. They are sooo great because I can’t manage to hurt myself with them, nor do I have to throw them away. They’ve got little measurement guides that come with the packaging so you can even use them to accurately measure your seam allowance!


- I can’t remember where this idea stemmed from, but it is pure genius.
Hold your pattern pieces together using staples!
Excuse me, Katherine, but did you just say staples?I sure did! And yes, this method can be a little more time-consuming than others at first, but eventually, you’ll find the right combination of steps to work for you and will be whizzing along in no time.
How do I do this? Simple. I find a stapler with a long neck, then, after I’ve matched up my fabric with a few clips, I staple within the seam allowance every couple inches. Mostly, I sew with a pretty small seam allowance, so after I’ve sewn the pieces together, I will use a handy-dandy staple remover tool like this one to remove all my staples.
Some people use a ½” seam allowance and then trim off the staples after they’ve sewn the seam. But, my staples are never ever in a perfectly straight line, so I prefer to take them out afterward. Personal choice, but you can do as you like!
Now, we get to talk about the actual sewing part. Thank goodness!

Instead, I take the curves nice and slowly, and hand-crank my hand-wheel one stitch at a time, manually. This means I use no power from my foot pedal, but allow my hand to give me the ultimate control of ensuring each stitch goes exactly where I want it, the first time!
That wasn’t so bad, now, was it?
#8: All about turning right side out!
When you turn your curve right side out, make sure to double-check that you’ve caught all the fabric in the seam, and stitch over it a second time if you feel it’s necessary or it’s on a high-stress point of the bag. If you see any puckers, make sure to address them right away. There’s nothing worse than having a beautifully completed bag, only to realize that you have the raw edges of some exterior fabric pulling away at the curved corner of your gusset.
#9: A little shout-out to Margareth from the first day of this amazing blog series for the last step. I HIGHLY recommend checking out her guest post about pressing for a professional finish—this applies to curves, and I couldn’t have explained it any better myself!
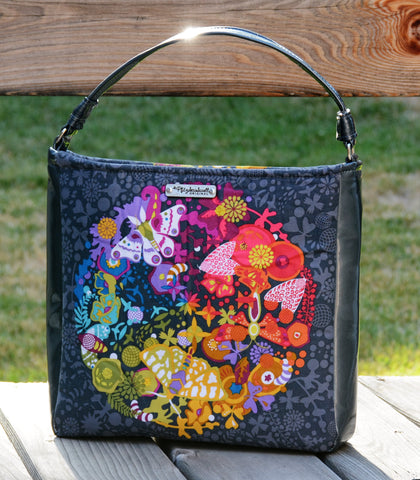
PHEW! Those are a lot of tips! You can see that, through applying these tips, I’ve successfully completed my bag, the Amalfi Hobo Bag, a PfitzSewSwell Original design! Doesn’t it look professionally done and fabulous??
I’m sharing a bonus tip today, too! It’s about an alternate method to turning (or birthing) your bag right side out.
Typically, patterns instruct you to leave a portion of the seam unsewn in your lining fabric. Then, you use the (in my opinion, always too tiny) hole in the lining to turn the entire bag right side out and press the seam allowances toward the wrong side of the bag.
If that weren’t enough already, you need to pin the edges together, making sure no raw edges show, then either slip-stitch it by hand or edge-stitch it using your machine. For myself, I never get the seam right on the first try, and have to rip things out to try again.
Which was a big pain. Until now.
Recently, I started to hear about the idea of an alternate way for turning bags. And it turns out huge companies manufacturing bags have been using this method all along.
It’s not hard to do, and I don’t know why I didn’t think of it sooner.
Turn your bag right side out through an interior zipper pocket!!!
This is SOOO easy it’s ridiculous. And you can make the turning hole as wide as your zipper pocket will allow!
I’ve seen it done a couple of different ways. Either way, you sew a standard zipper pocket into the lining.
Sometimes, the zipper pocket panel fabric is:
- one long piece, and other times, it’s
- two smaller pieces that you sew together.
If you use two smaller pieces, you should have a built-in hole already.
MAKE SURE TO COMPLETELY UNZIP THE ZIPPER POCKET ALL THE WAY!
This is where I have a special trick to make sure that your seam to close up the zipper pocket is as neat as possible.
I am obsessed with this tape. I found it at Tandy Leather, and it is seriously sticky (way more so than Wonder Tape, which I love, too.). I do not recommend sewing through it directly as it will gunk up your needle (speaking from personal experience, again!)
I use the 3/16” tape on the wrong side raw edge of each piece of the pocket I’ve got in front of me. Then, I fold the fabric + tape back to create a finished edge. I do this for both sides.

When you’ve double-checked that everything is as it should be, simply take the two finished edges at the bottom of your zipper pocket, match them up (which shouldn’t be hard because you’ve got your edges neatly finished), and edge-stitch the pocket.
Why is this genius?
Because your turning hole hides at the bottom of that pocket, where no one ever looks. It looks great because of the raw edges hidden neatly away and your bag lining is perfectly sewn and unripped since you didn’t have to turn through the lining.
Isn’t that amazing?! I sure think so!
Well, it’s been an honor to guest blog about two of my newfound favorite parts of bag-making! I hope you’ve either learned something or had something explained in a new and different way. In any case, I hope you find this post to be useful and helpful for you.
Now comes some exciting news on my part…I have just re-launched my website over at PfitzSewSwell.com. As this is launch weekend, I have some pretty fancy deals and am doing a giveaway for my one of my bags! If you want to be in the running, make sure to stop by my page for more details…you won’t regret it!
You can also find me on:
Facebook at: http://www.facebook.com/PfitzSewSwell
Instagram at @pfitzsewswell
Twitter at @pfitzsewswell
Thanks, everyone, and sew on and sew forth! (Get what I did there?...I do love a good pun!)
:)
--Katherine

8 comments:
Great information! Thanks!
Thanks for this, Katherine. I just made myself giggle when I started to write this comment. I was about to say, "Great information! I've bookmarked this post. Thank you." And then I realized I'm starting to sound like the stupid s.p.a.m. comments I delete every day from my own blog. But seriously, this is an exceptional tutorial. I have yet to try that pocket bottom birthing, but that might be because I haven't finished a bag in months.
I'm off to stalk you on social media.
Great tips
Great tips
Thank you so much!!!
WOW! Thank you! I'm be looking you up!
Katherine entertaining and informative. Thanks
Hi Katherine, great post, love the pic of all the wonder clips round the corner, it made me smile! I'll try a few staples instead!
Post a Comment