Waxed canvas has been on my "want to try" list for a long while, I absolutely love the look of waxed canvas and I'm intriqued by the water resistance and durability it offers. It's sat on this list for an embarassingly long amount of time until Blue Calla released the
Waterlily Waxed Canvas Tote. Although the
Waterlily can be made in any material, it's the perfect pattern to use waxed canvas, so when put out this pattern as a test pattern, this was my chance to finally do it.
If you look up waxing canvas there are about one million tutorials and recipes, but they all boil down to 2 essential ingredients and some optional ingredients: bees wax and parafin. Some recipes call for oils such as boiled linseed oil and turpentine, so really it's all about your preferences. I found that just the parafin and beeswax alone made a nice wax to work and yielded good results.
Also, there are two ways to wax your canvas, before you sew your bag and after. Both have their advantages and disadvantages. You can find a great tutorial by Blue Calla Patterns on how to wax your canvas before you sew
here.
Your basic tools are something to heat the wax to melt and something heat the wax once it's applied to the canvas to get it to absorb into the fabric itself. If you are doing it before you sew, you can use ann iron, but if you wait to apply it til yourbag is finished you will need a heat gun or blow dryer. I purchased all my supplies on amazon.
I opted to get a cheap crockpot on Amazon to keep for wax only (I don't even want to imagine cleaning the wax out of it to use for cooking later).
I used about 1/3 beeswax and 2/3 parafin as Blue Calla's tutorial suggests. When I added the wax to the crock pot, I waited, and I waited and I waited for it to melt. So, word of advice start heating up the wax long before you are going to need it.
I might have cheated and used the heat gun to speed up the melting process after losing patience. But, I can't confirm or deny that.
Since I waited to wax my tote until after I was done sewing, I had to use a little care when applying the wax to make sure it only waxed the areas that I wanted it to. It was surprisingly easier to control that I had thought it would be. The wax paints on and dries quickly, leaving a layer of wax on the top of the fabric that makes you wonder if you are doing this right. If you think this too, then you are doing it right.
There is really no exact science to how to apply the wax, I did small sections, but I imagine you could just as same do the whole bag. Once your applied wax has tried, take your heat gun to heat the wax you applied to the bag and then watch as MAGIC happens. Where the heat gun is applied, the wax will magically absorb into the canvas and take on a different look.
The great thing is, this is sooo forgiving, you can always add more wax to areas that look sparse or reheat the wax to work out any areas that seem to be heavier coated with wax.
The finish look is that of a rugged, distressed bag. You'll notice in other waxed canvas bags the wax lightens in areas it has been folded. If you like this distressed look, crinkle up your bag. If you don't like this look, then just apply a bit more heat and the creases and lightening will fade until the bag is crinkled up again. Magic!
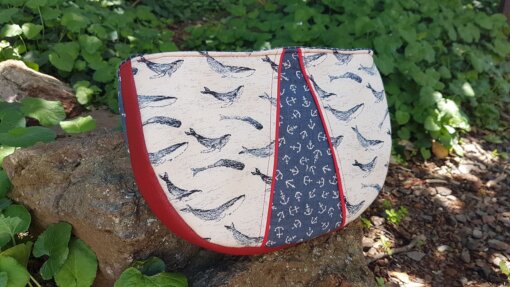
I didn't take any good before and after photos like I should have, but you can see in the photo above that the canvas that is waxed on the bag is darker than the unwaxed fabric I used for the strap.
Here's a terrible photo of the finished bag before waxing:
As for the
Waterlily, I adore this pattern, and it isn't neccessary to use waxed canvas. It's a relatively easy sew, with the most complicated part keeping all the pieces sorted out with all the rectangles that you cut. I really like that the pattern includes a labeled photo as to which piece goes where, so you can plan out your fabric placement easily when cutting. I sometimes have a hard time visualizing where pieces go duing the cutting process, so this was a huge help for me.
It has a top recessed zipper, a zippered front pocket and a back divided slip pocket. Inside there are even more pockets! This bag came together so quickly, and I love the look of the rolled handles. This is definitely a great confident beginner bag as no steps are exceptionally challenging.
If you have been wanting to try waxing canvas, get on it! It's such a forgiving and satisfying project. And for the cost of what you would pay for 2 yards of waxed canvas you can get almost all the supplies you need to make it yourself.
Have you tried waxing canvas or working with waxed canvas yet? I'd love to hear your thoughts!


 Posted by
The nosy pepper
Labels:
Accessories,
bag links,
Bag making,
bag making tips,
Bagineer news,
Bags,
DIY,
hardware,
notions,
pattern releases,
Sew Sweetness,
sewing,
The Bag Buzz,
Tutorials
at
11:28 AM
2 comments:
 Posted by
The nosy pepper
Labels:
Bag making,
bag making tips,
blue calla patterns,
pattern reviews,
sewing,
sewing bags,
tote bags,
waxed canvas,
waxing canvas
at
6:45 AM
1 comment: